Creating a Search
These are the basic steps to creating an ad-hoc search.
- Open Search and Reports
- Select the Ad-hoc search
 button from the toolbar.
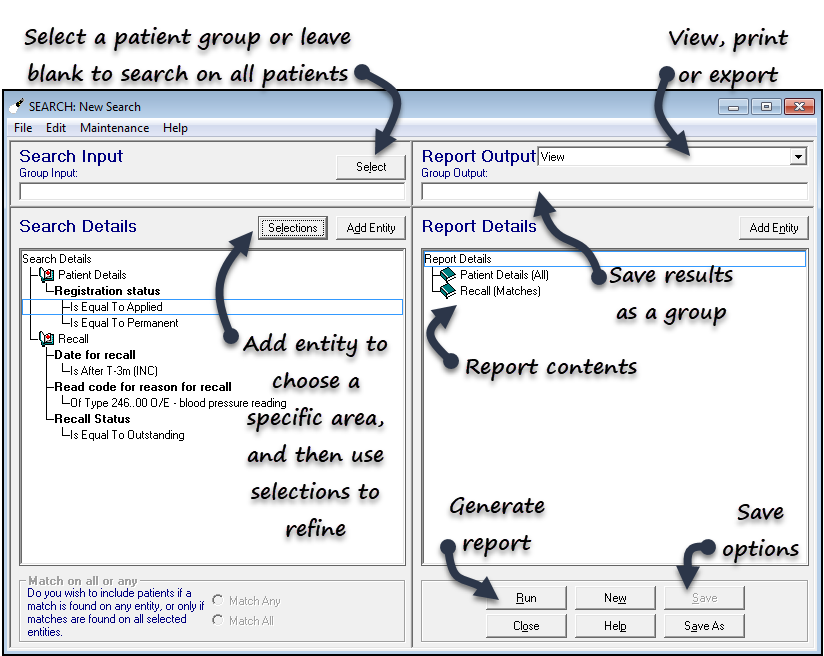
The SEARCH: New Search screen displays. - Optionally, double click in the Group Input box to select a patient group to base the search on, for example, all diabetics.
The group could be from Clinical Audit, patient groups or created from a previous search.
See - Selecting a Group. - Enter the Search Details, for example, permanent and applied patients and Systolic Blood Pressure over 150.
- Define patient selection
Choose to search on all patients or for example, permanent and applied. See - Patient Details. - Add entity
Select the data categories you want to search on, for example, blood pressure. See - Add Entity. - Add further entities as required
For example, add the weight entity to the blood pressure search to find patients with a high BMI. - Options
This can be used to define include / exclude patients with certain criteria. For example, exclude patients with a current repeat medication in a specific drug class. See - Include / Exclude Options.
- Define patient selection
- Refine the Report Details.
- Add entity
This includes additional information on the report, for example, medication. See - Report Details. - Matches
Define whether to look at the latest entry, for example, only the patient's last blood pressure. See - Matches.
- Add entity
- Optionally, double click in the Group Output box to save the results as a patient group.
This allows you to use the group in a future search or generate letters / recalls. - Choose the Report Output.
Define view, printed report or export the data. See - Report Output Overview. - Select Run to generate the search.
- If required, select Save to save the search for future use.
Menu Options

File
- Save and Save As - Save the report, or Save As to save under a different name.
- Report on Last Search - If you have run a search, and want now to use a different report format, use this option rather than reprocessing the search.
- Exit - Return to the Search and Report menu without saving any criteria.
Edit
- Search Details - The menu options of Add Entity, Remove Entity, Selections, Include/Exclude Options, Show Entity, Show Attribute or Show Criteria.
- Report Output - For Summary or Standard report outputs, you can Edit Report Format.
- Report Details - Shows the menu options of Add Entity, Remove Entity, or Options.
Remove Entity and Options are greyed out unless an entity is selected.
Maintenance
- Age Bands - Define the age band groupings. See - Age Bands.
Note – To print this topic select Print  in the top right corner and follow the on-screen prompts.